side

Chicken Salad by Cynthia Raub

Print Friendly and PDF
chicken salad recipe with croissants and crackers

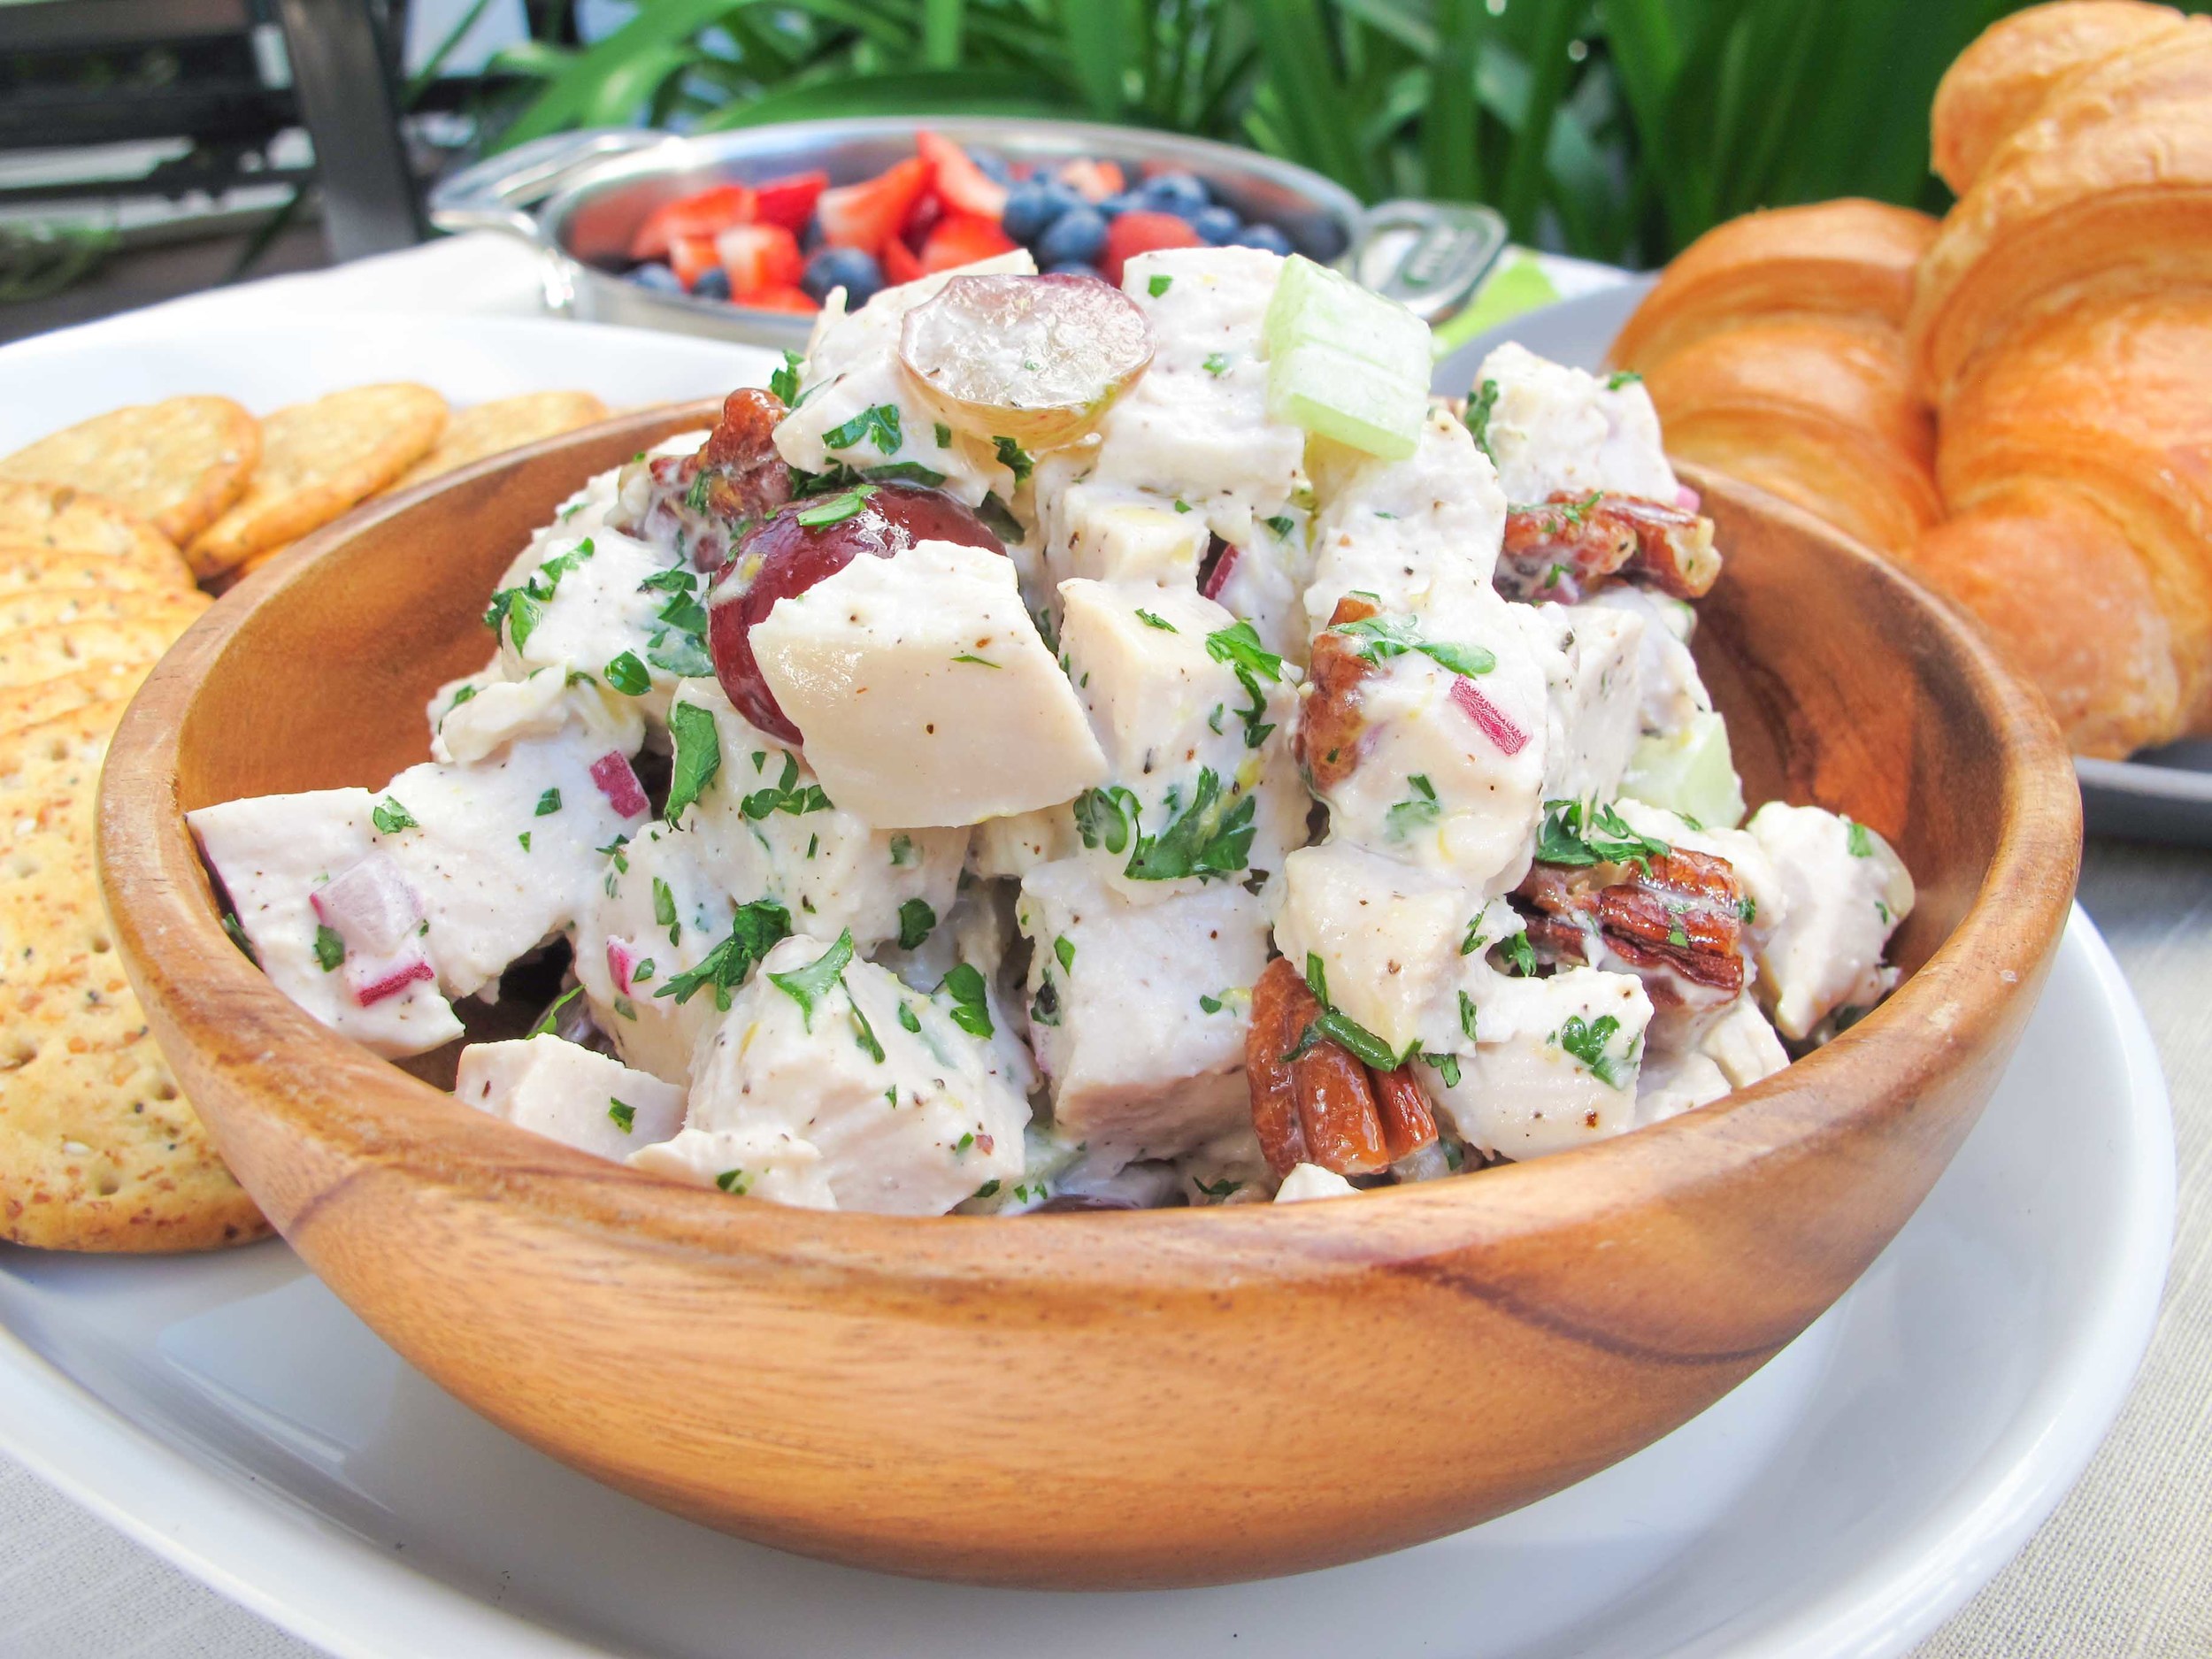
Is there anything to dislike about chicken salad? Unless you are a vegetarian or vegan, or you don't care for mayonnaise (Amy . . . ), what is there not to love? Tender supple chicken accompanied by a crisp crunch of celery, a little sweetness from the fruit of choice, all brought together by a delicate mayonnaise dressing. Ahhh! Sounds like the perfect lunch or snack to me. I love sandwiches because they deliver the perfect bite and I especially have a thing for loosely filled sandwiches. I'm always looking for more recipes to make that keep well, and are easy to make larger quantities without much more work. This is one of those recipes and I promise it will be a crowd favorite, unless the crowd is vegetarian or hates mayonnaise (Amy . . . ).

Notes: This recipe requires a fair amount of chopping, but it comes together in a cinch. It involves very little to no cooking, depending on what chicken you choose to use. In a pinch, you can always shred chicken from a store-bought rotisserie bird or you can buy prepared chicken meat; however, I would strongly suggest you try the simple poaching method, (recipe below,) to get tender chicken and a delicious broth simultaneously with hardly any extra work. The grapes in this recipe can also be substituted with other fruit such as diced green apple or dried cranberries. I love chicken salad on a croissant because, why not? But, it's also a dream on sliced white bread, a simple roll, or on crackers.


Time: 20 minutes
Yield: 4 cups

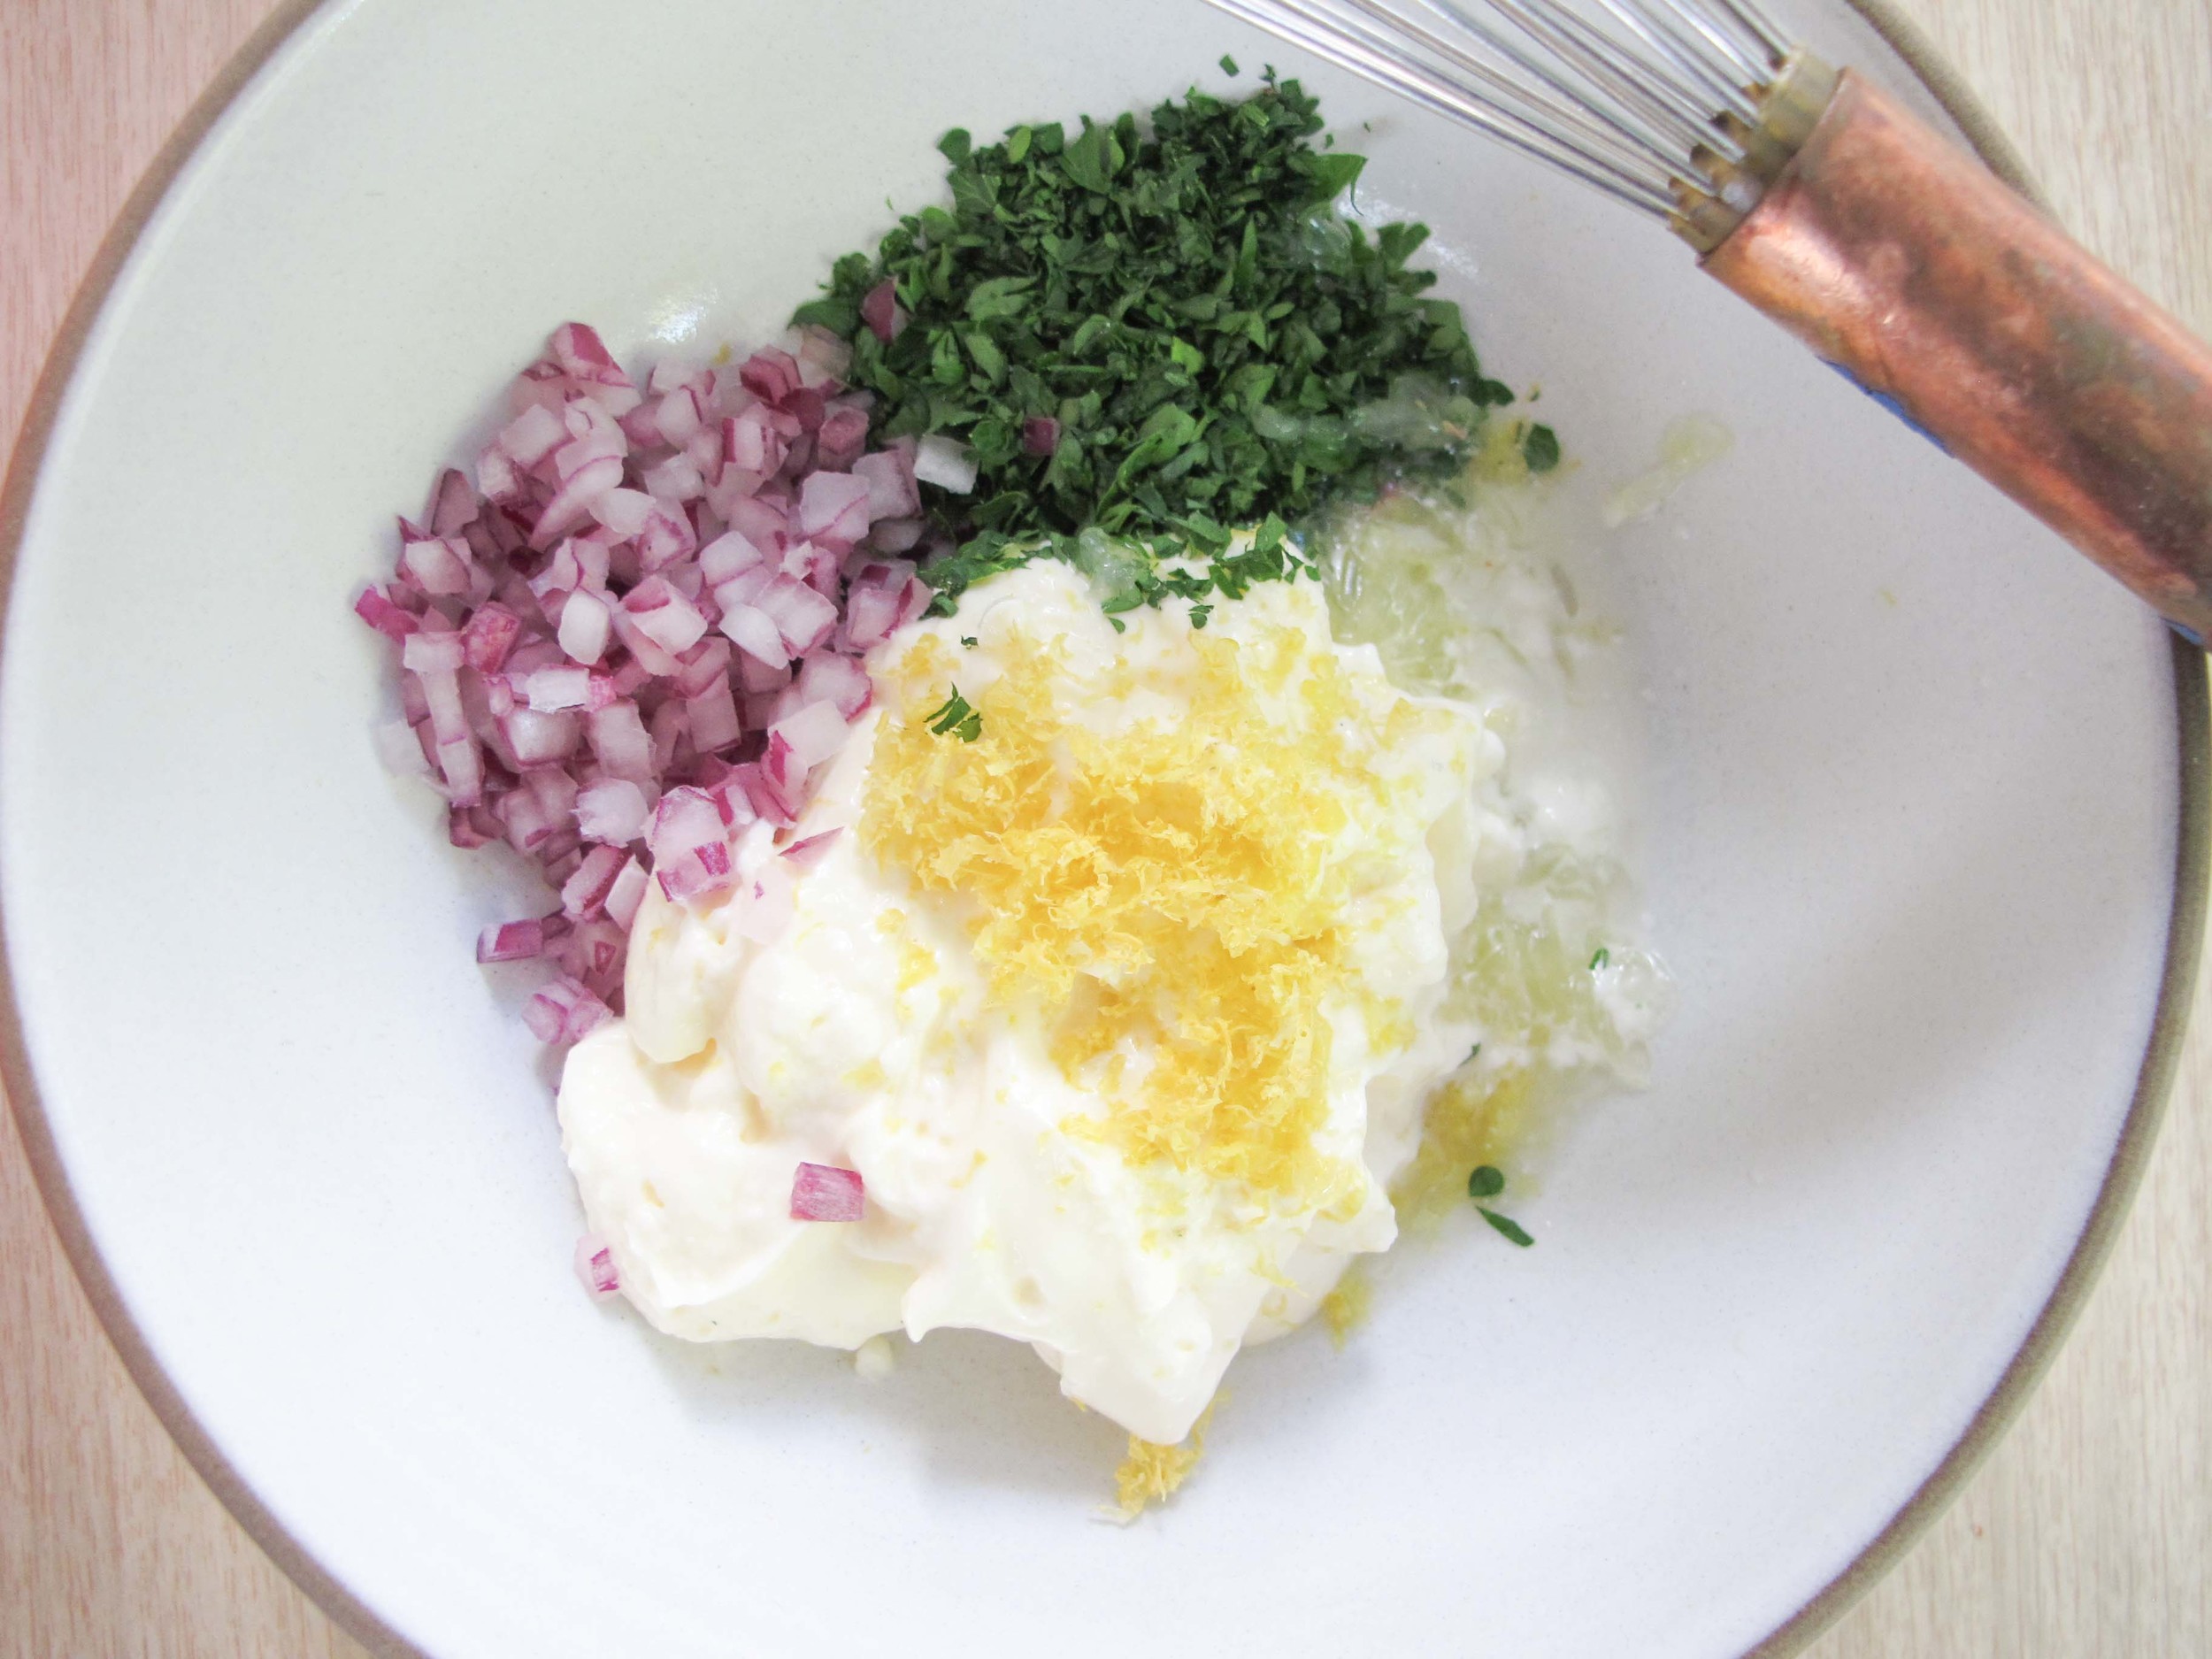
1 tablespoon lemon zest
2 tablespoons lemon juice
1/2 cup mayo
1 1/2 teaspoon salt
1 teaspoon black pepper
1 teaspoon sugar
2 tablespoons chopped parsley
1/3 cup red onion, finely diced
1/2 cup toasted pecans, roughly chopped
3 cups (about 2 pounds) poached chicken, diced (Recipe Below)
1/2 cup celery, small dice
3/4 cups grapes, halved

In a small bowl, make the dressing by combining lemon zest, lemon juice, mayonnaise, salt, black pepper, sugar and parsley. Set aside.

In a large bowl, combine red onion, pecans, chicken, celery, and grapes. Pour dressing over chicken and stir to combine. Taste and adjust for seasoning. 

Serve as a sandwich on a roll, croissant or sliced bread; or with crackers as a light side or appetizer.

Poached Chicken

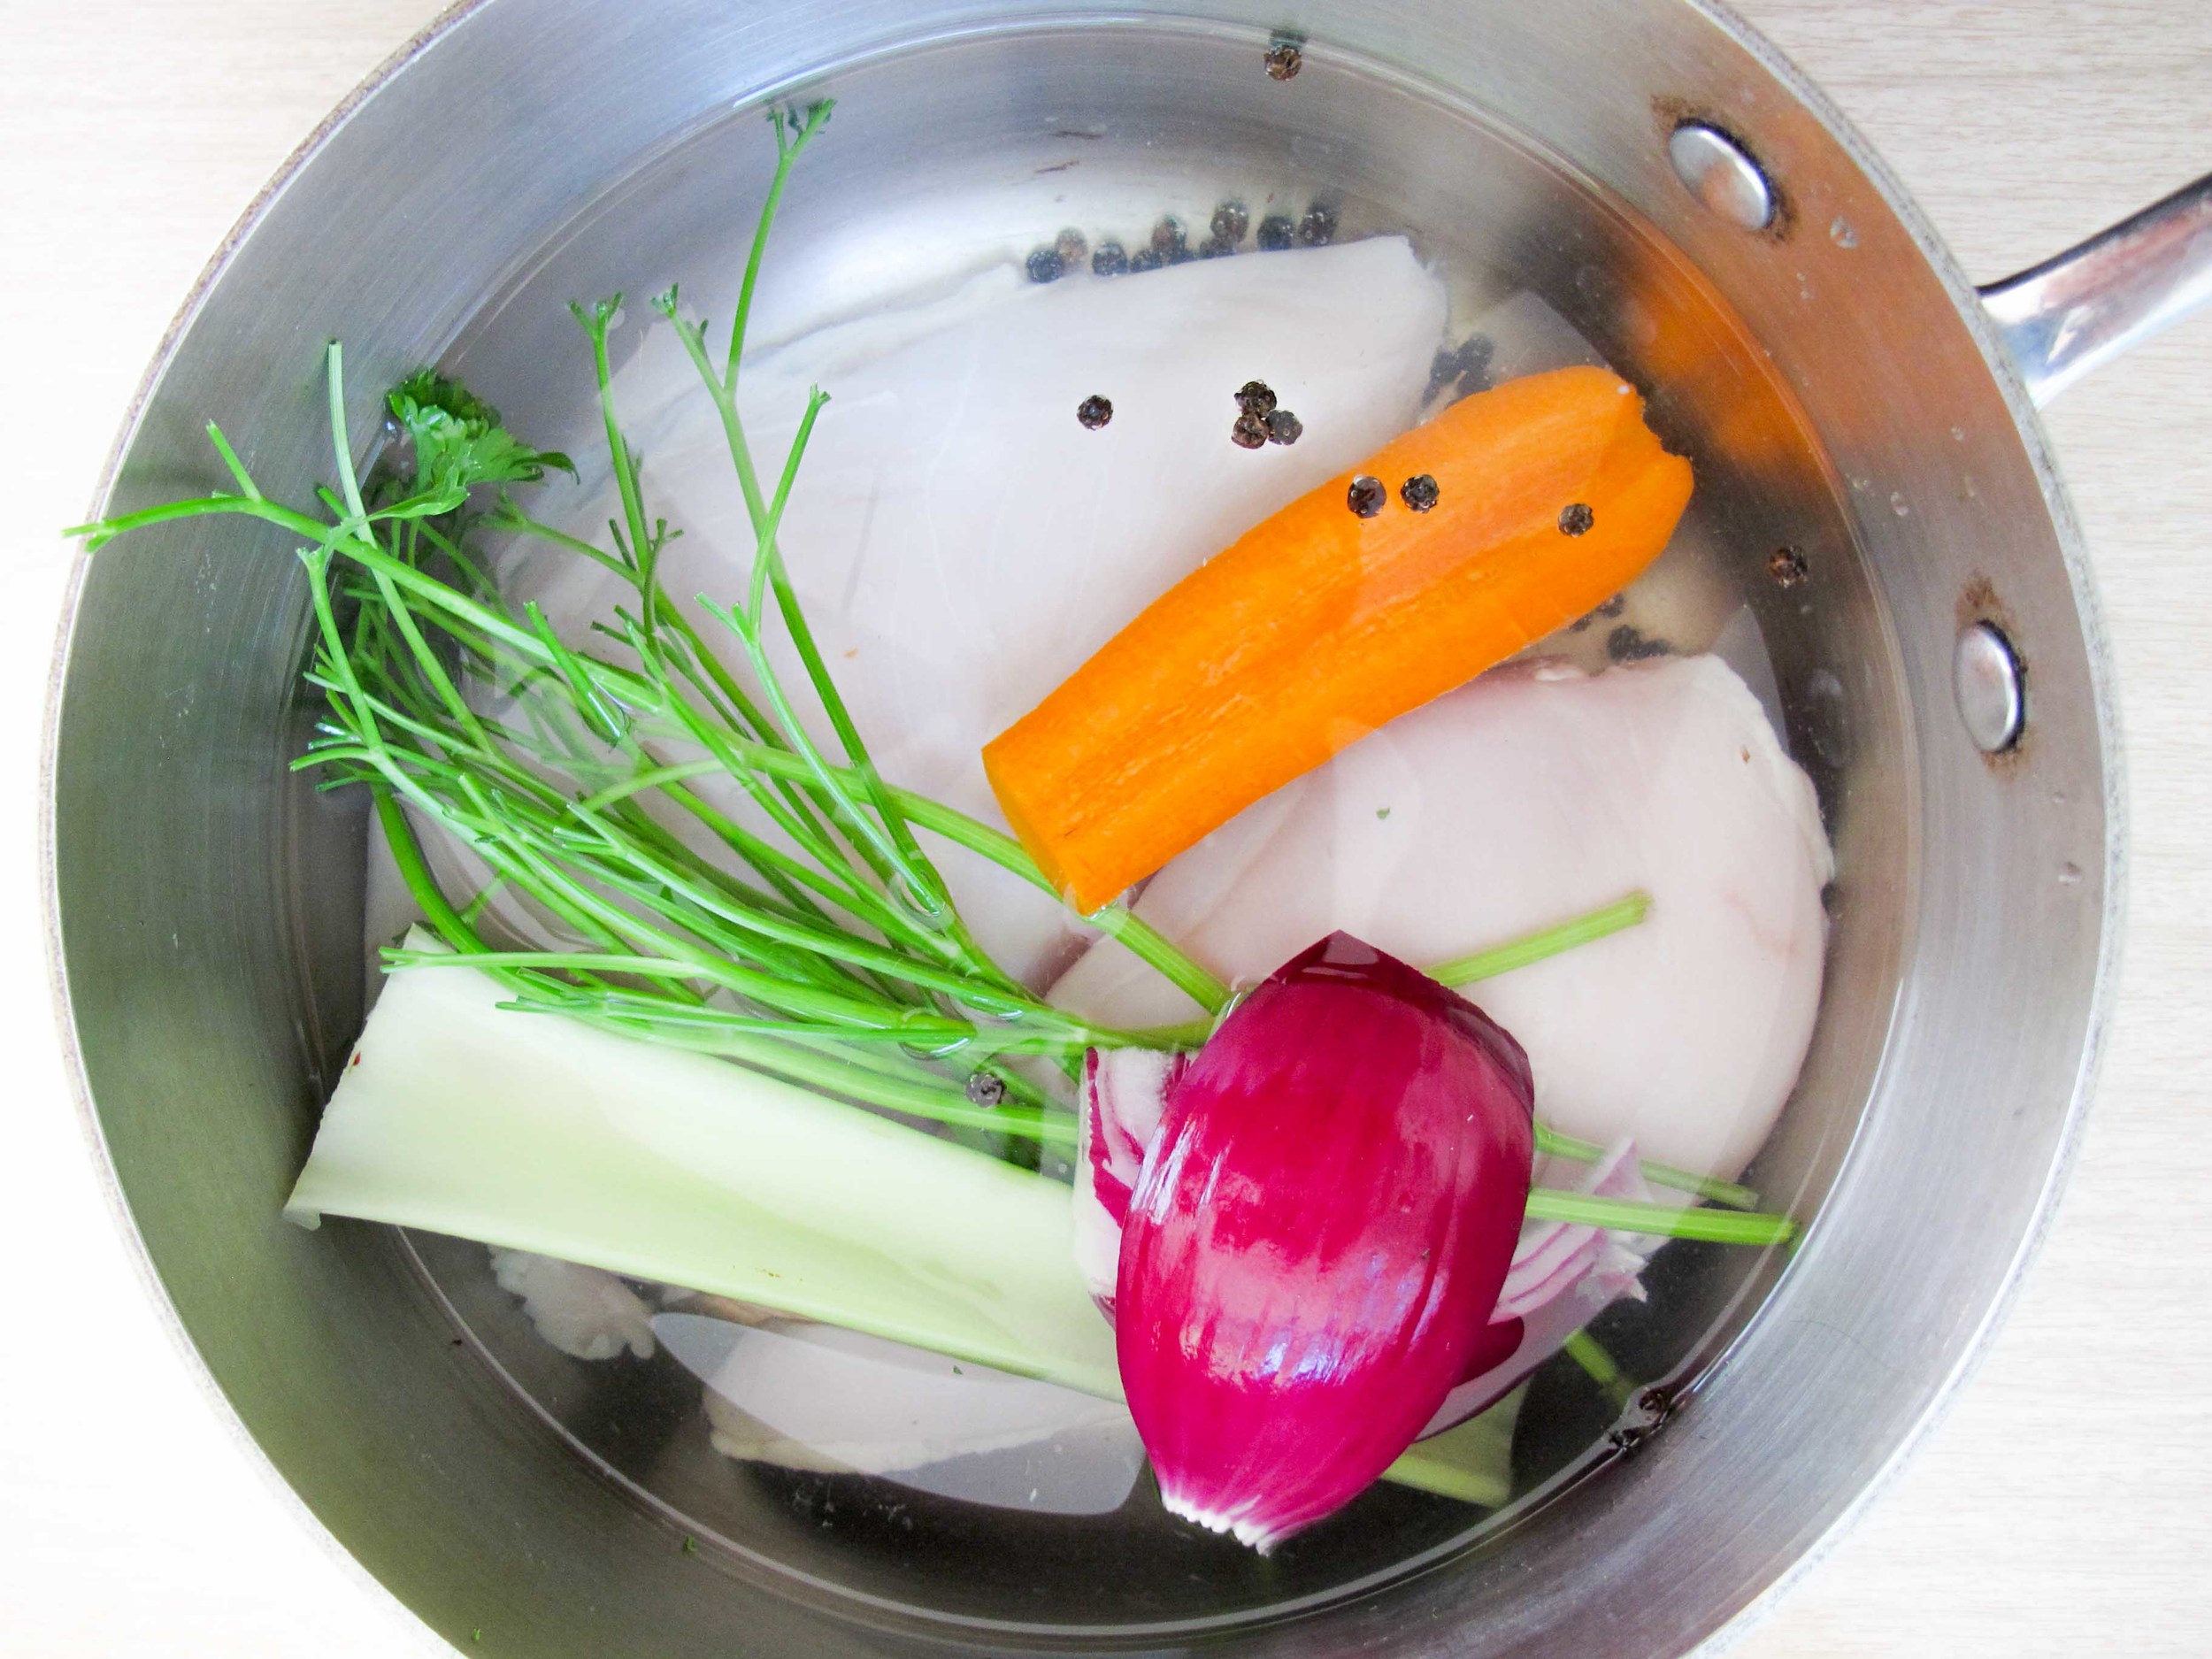
2 pounds chicken breast (about 3 moderately sized breasts)
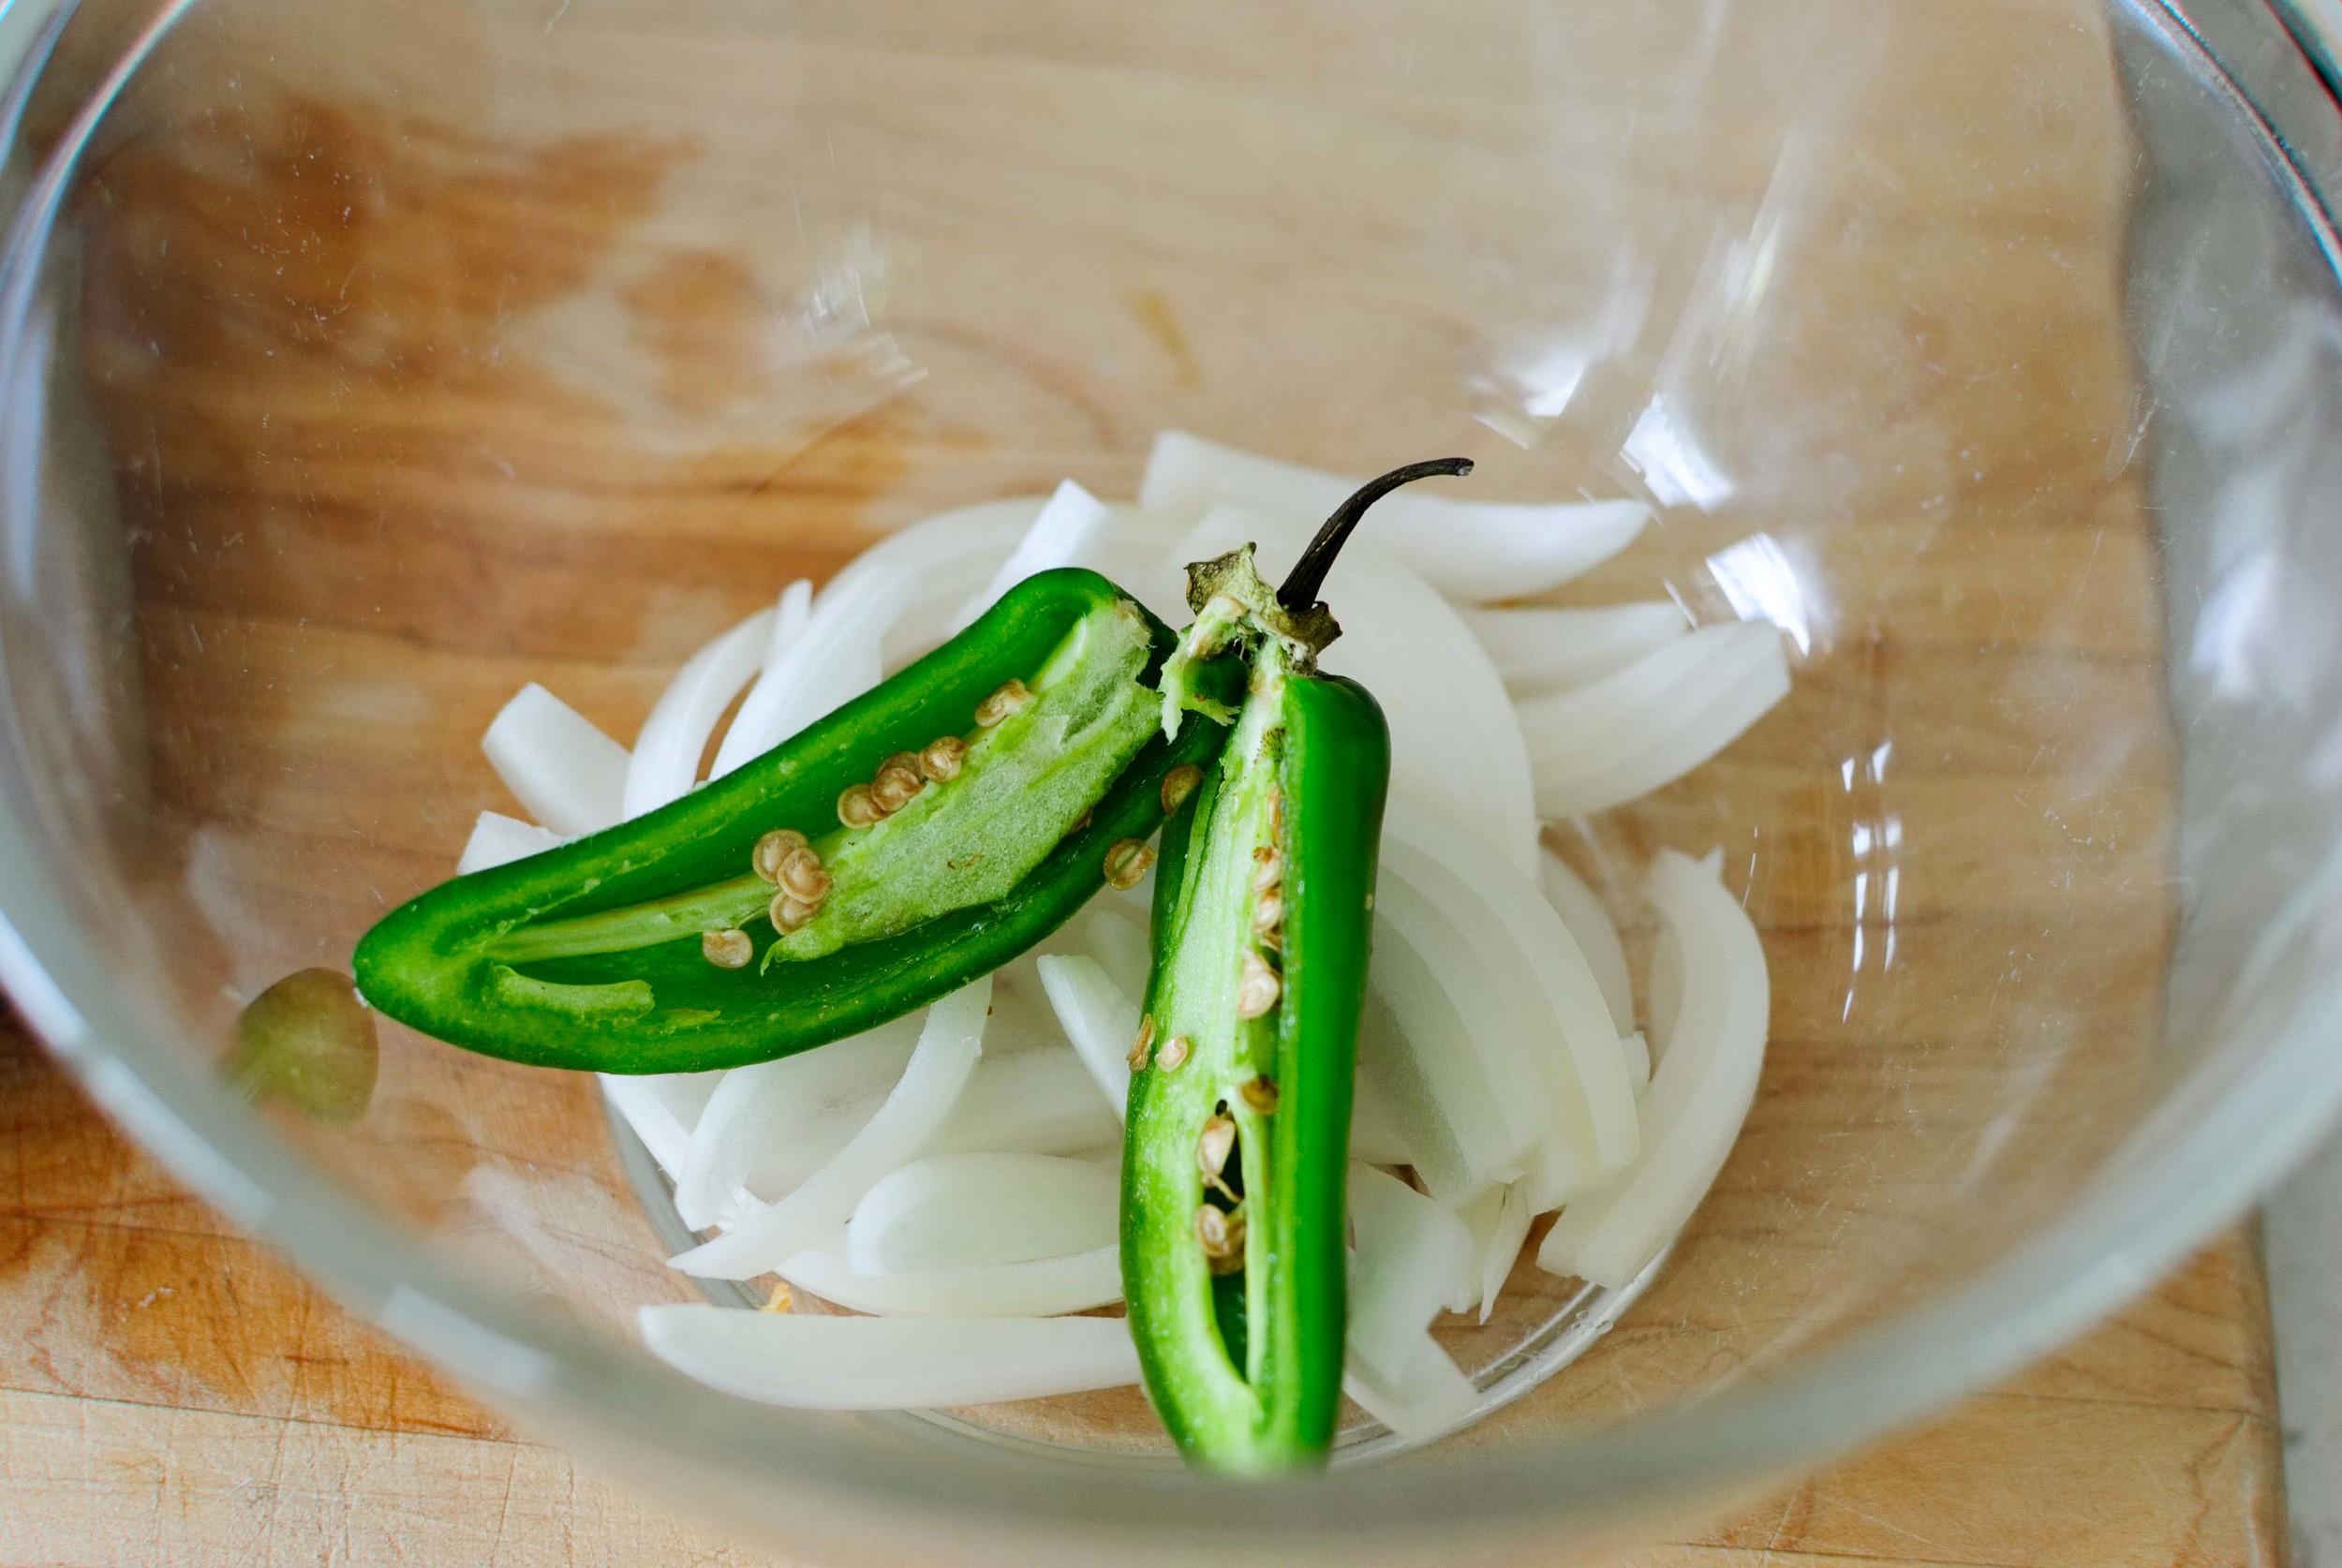
1/2 carrot
1 celery rib
1/2 onion
10 parsley stems
1 teaspoon black peppercorns
1 tablespoon salt
Water

Place chicken in a large pot and cover with water by 1 inch. Scatter carrot, celery, onion, parsley stems and peppercorns on top. Season with salt. 

Turn heat to medium high and bring the pot to a simmer. Allow to simmer for 3 minutes, then turn off the heat and cover the pot with a tight fitting lid. Set aside and allow chicken to finish cooking in the hot liquid. Leave the chicken to cool in the pot, about 1 hour. 

Remove chicken and dice into 1/2 pieces. Strain liquid from vegetables for a beautiful and easy broth.
 

Flatbread with Chicken Shawarma, Eggplant, and Caramelized Onions by Cynthia Raub

Print Friendly and PDF

Recently, I got an email from NYT Cooking that was sharing Sam Sifton's Oven-Roasted Chicken Shawarma. It is one of those invaluable and easy pantry dishes that come together with very little prep and even less hands-on cooking. Throw marinade and chicken into a bag, let sit, dump on a sheet tray and toss it in the oven. And then what emerges is fragrant, multi-dimensional, and tasty chicken. The chicken is highly versatile as it can be served alongside typical Mediterranean sides and dishes like pita, cucumber and tomato, hummus, and rice. Or, I thought, you could throw it on a flatbread (a.k.a. pizza dough) and feel like a real, true and actual genius. Do you know what else is genius? Outsourcing the luscious spread to marry the flatbread and chicken together. You see, I am all too familiar with Amy's love for eggplant and I decided to exploit it. I told her I was planning on making the chicken shawarma, and I thought about putting it on a flatbread but that's where my ideas ended. Dang, shoot, crud - I'm plum out of ideas! Oh what could possibly be irresistibly delicious to spread on the flatbread? Then like a horse out of the gate, Amy threw out a dozen ideas, and it ended with roasted eggplant with caramelized onions. That was it. We are going to make this together, eat it, and be happy.


Notes: I used this recipe for the flatbread and pre-cooked the bread before adding any of the toppings. Like pizza, flatbread can be topped with nearly anything, so in the words of Melania Trump (just kidding, FLOTUS Michelle Obama) about flatbread toppings, "the only limit to your achievement is the strength of your dreams and your willingness to work for them." #foodwisdom


Read More: The Shared Craving


Time: 15 minutes to assemble
Makes 2 flatbreads

2 flatbreads, pre-baked
1 cup Eggplant Dip with Caramelized Onions and Tahini
1 1/2 cups shredded Chicken Shawarma
1 cup crumbled feta cheese
1/4 cup mint, chopped or chiffonade
Olive oil for finishing
Lemon wedges for serving

Preheat oven to 400 degrees. Place pre-baked flatbread dough on a full sheet tray. Spread eggplant dip generously over each flatbread and top with shredded chicken shawarma. Split feta between the two flatbreads and sprinkle evenly. Drizzle or brush edges of crust with olive oil.

Put the flatbread in the oven and cook until edges of the bread are golden and crisp and the spread, chicken and cheese are warmed through, about 6-8 minutes. Slice the flatbread and garnish with mint chiffonade and lemon wedges. 

Mustardy Potato Salad by Cynthia Raub

Print Friendly and PDF

Potato salad isn't the most alluring side dish at the barbecue - often times overcooked potatoes are drenched in mayonnaise, which makes it difficult to tell what other ingredients lurk under the dressing. But, this mustard-heavy, tangy version is bright and flavorful, a perfect counterpoint to rich barbecued meats. The baby potatoes are supple and firm, while the crisp green beans lend a fresh crunch to every bite. All the while, the light and tart mustard dressing showcases the beautiful vegetables in appearance and flavor. 

Notes: This side dish can be made in advance and only gets better after the first 24 hours. Also, adding the seasoned dressing to hot potatoes will yield more flavorful potatoes. The potatoes will absorb the dressing while they are still hot and it makes such a big difference in their flavor! You can also substitute the green beans for practically any other hearty summer vegetable, but I love the crisp snap from the green beans opposed to the dense chew of the potatoes.


Time: 25 minutes
Servings: 8-10

3 pounds baby potatoes
1 pounds green beans, trimmed and cut into 1-inch pieces
1/3 cup finely minced red onion
2 cloves of finely minced garlic
3 tablespoons whole grain mustard
1 tablespoon dijon mustard
2 tablespoons mayonnaise
2 tablespoons apple cider vinegar
1 tablespoon kosher salt (+ more for boiling the potatoes)
1 teaspoon freshly cracked pepper

In a large pot, cover potatoes with 1 inch of water and season water with 1/4 cup of salt. Bring the potatoes to a boil over high heat and cook for 15-20 minutes, until tender and easily pierced with a knife.

As the potatoes are boiling, in small bowl combine the red onion, garlic, whole grain mustard, dijon mustard, mayonnaise, apple cider vinegar, salt and pepper. Whisk to combine and set aside. 

When the potatoes are cooked, strain them carefully into a large colander. Drape a clean kitchen towel on top of the potatoes to absorb any excess moisture. 

In the same pot, bring water to a boil and season with salt. Add the green beans and cook until tender-crisp, about 1 minute. Strain carefully into a colander and toss to release steam, excess water, and to cool slightly. 

Once the potatoes are cooled enough to touch (but still very warm or hot), slice in half and add to a large bowl. Add the mustard dressing to the potatoes while the potatoes are still hot so they can absorb the flavors in the dressing. Add green beans and toss to coat with the dressing.

Pesto Pasta Salad with Roasted Tomatoes by Amy Cantu

Print Friendly and PDF


The first time I ever made a Pesto Pasta Salad with store bought pesto, I thought, really? This is it? I was underwhelmed and disappointed because I was looking forward to luscious pesto coating hot, long strands of pasta. The pasta was too firm, (even though I cooked the pasta to al dente,) with only a hint of basil, and it just tasted flat. This recipe for Pesto Pasta Salad with Roasted Tomatoes is not altogether different from that first attempt, but it tastes worlds apart. THIS pesto salad is a glorious celebration of summer, and the difference is all in the details. I made my own pesto sauce (instead of store-bought) using fresh basil. I toasted the pine nuts to bring out their nutty flavor. Beautiful summer cherry tomatoes were roasted to make them taste like candied tomatoes, without adding any sugar. I made sure to check the seasoning and add more salt before serving, to keep the flavors tasting bright and savory. Milky fresh mozzarella provided nuggets of soft, creamy flavor and texture. Each pesto-infused bite of pasta was a revelation in my mouth, with big, bold basil flavor. I was very, very happy.

Notes: I beg you to try making your own pesto at least once, (as in this recipe,) before deciding to use the store-bought kind. I have definitely used store-bought before for convenience, but when I developed this recipe, I did a side-by-side comparison of freshly made pesto vs. the store-bought pesto, and the fresh pesto blew my mind. Really. The difference was huge, and if you have a food processor or blender, fresh pesto only takes a few minutes to make. 

I have been overcooking my pasta for pasta salad by a minute or two ever since I read this post on Serious Eats about how pasta gets stiffer when it cools, so over-cooking the pasta a bit for pasta salad is great because it keeps the texture from getting too firm.

Pine nuts are at least half of what makes pesto so darn good, but I realize they are pricey. You can substitute half or all of the pine nuts for walnuts, and it will be a suitable substitution.

This Pesto Pasta Salad alongside Cynthia's Mediterranean Turkey Burgers and Mustardy Potato Salad makes an amazing barbecue. Adding shredded or diced chicken would also make this the perfect light summer meal, rather than a side.


Time: 45 minutes
Servings: 8-10

1 pound cherry tomatoes
1 tablespoon plus 1 cup extra virgin olive oil, divided use
Kosher salt
Freshly ground black pepper
1 cup pine nuts, divided use
1 pound farfalle (bow tie) pasta
1 cup parmesan cheese, grated
4 cups basil leaves, packed (about 5 ounces)
4 cloves garlic, roughly chopped
1/2 cup parsley, finely chopped
1 cup green onions, thinly sliced
pound fresh mozzarella, cut (or torn) into 1-inch piece

Preheat oven to 400 degrees F. Combine cherry tomatoes and 1 tablespoon olive oil on a rimmed sheet pan. Sprinkle lightly with salt and pepper. Roast tomatoes for 20-25 minutes, until tomatoes are soft and releasing some of its juice. Let cool.

Reduce oven temperature to 375 degrees F. Place pine nuts on a rimmed sheet pan, and toast in oven until golden brown, about 5 minutes. Let cool.

Meanwhile, bring a large pot of salted water to boil. Stir in pasta, and adjust heat to maintain a low boil. Cook for two minutes longer than the package instructions. Drain and rinse pasta in cold water until the pasta is no longer warm.

Make pesto: Combine 1/2 cup toasted pine nuts, parmesan, basil leaves, and garlic in a food processor or blender. Process until a paste is formed, stopping to scrape the container down as needed. With the motor running, drizzle in 1 cup olive oil, and process until the oil is fully incorporated and pesto is smooth.

In a large mixing bowl, combine pasta, pesto, chopped parsley, sliced green onions, and remaining toasted pine nuts until pasta is evenly coated. Add half of the roasted tomatoes and half the mozzarella and toss to combine. Taste and adjust seasoning with additional salt and freshly ground pepper. Pour pasta salad into a large serving bowl, and arrange the remaining tomatoes and mozzarella on top. Serve at room temperature.

Lentils with Broiled Eggplant by Amy Cantu

Print Friendly and PDF

Luxurious. I would not have ever imagined that I might describe a lentil salad this way, but luxurious is exactly the perfect word. Smoky, silky, creamy, spicy, and a bit tangy: All of these sensations tangle together into one luxurious bite after another. Eggplant can be sensual. Yes, I said it. The broiled eggplant lifts ordinary lentils into a sensual tizzy of textures and flavors, and I don't think I've been the same ever since! Please eat this. It's a feast of colors for the eyes, sustaining nutrients for the body, and sensual luxury for the mouth and tongue. I understand completely now why Yotam Ottolenghi's approach to treating and eating vegetables can become an obsessive experience. I am forever changed, and now seeking to cook every single recipe in his cookbooks. (Speaking of which, Cynthia shared Ottolenghi's Rice Salad with Nuts and Sour Cherries with us, and I will be making this immediately. So good.)

Notes: The smoky broiled eggplant is what makes this dish so special. Roasting them directly over a gas stove is the fastest way to cook them and achieve that smoky flavor, but it definitely made a mess that took scrubbing to clean up. If you can lay down aluminum foil around the flame to catch some of the drippings, that would help a lot, but this was hard to do with my particular stovetop. Using the oven broiler to roast the eggplant is a less messy alternative, but it does take an hour instead of 15 minutes. If you choose the broiler method, please ensure that you poke the eggplant all over with a small sharp knife, to allow steam to escape. Otherwise, the eggplant may explode all over the oven - an even bigger mess to clean up!

The harissa is optional, but I was so happy to have a jar of homemade harissa gifted to me from Cynthia. It elevated this already excellent lentil salad into something truly special.


Time: 45 minutes to 1 hour, 30 minutes (depending on your method for roasting the eggplant)
Servings: 4

2 medium eggplants
2 tablespoons top-quality red wine vinegar
salt and black pepper
1 cup small dark lentils (such as Puy or Castelluccio), rinsed
3 small carrots, peeled
2 celery stalks
1 bay leaf
3 thyme sprigs
1/2 white onion
3 tablespoons olive oil, plus extra to finish
12 cherry tomatoes, halved
1/3 teaspoon brown sugar
1 tablespoon each roughly chopped parsley, cilantro and dill
2 tablespoon crème fraîche (or natural yogurt, if you prefer)
2 tablespoons harissa (purchased or homemade), optional

To cook the eggplants on a gas stovetop, which is the most effective way: Start by lining the area around the burners with foil to protect them. Put the eggplants directly on two moderate flames and roast for 12 to 15 minutes, turning frequently with metal tongs, until the flesh is soft and smoky and the skin is burnt all over. Keep an eye on them the whole time so they don’t catch fire.

To broil the eggplants in an oven instead: pierce the eggplants all over with a sharp knife. (This creates exit points for the steam to escape the eggplant; otherwise, the eggplant will explode and make a giant mess!) Put them on a foil-lined tray and place directly under a hot broiler for 1 hour, turning them a few times. The eggplants need to deflate completely and their skin should burn and break.

Remove the eggplants from the heat. If you used an oven broiler, change the oven to its normal setting. Heat the oven to 275°F. Cut a slit down the center of the eggplants and scoop out the flesh into a colander, avoiding the black skin. Leave to drain for at least 15 minutes and only then season with plenty of salt and pepper and 1/2 tablespoon of the vinegar.

While the eggplants are broiling, place the lentils in a medium saucepan. Cut one carrot and half a celery stalk into large chunks and throw them in. Add the bay leaf, thyme and onion, cover with plenty of water and bring to the boil. Simmer on a low heat for up to 25 minutes, or until the lentils are tender, skimming away the froth from the surface from time to time. Drain in a sieve. Remove and discard the carrot, celery, bay leaf, thyme and onion and transfer the lentils to a mixing bowl. Add the rest of the vinegar, 2 tablespoons of the olive oil and plenty of salt and pepper; stir and set aside somewhere warm.

Cut the remaining carrot and celery into 3/8-inch dice and mix with the tomatoes, the remaining oil, the sugar and some salt. Spread in an ovenproof dish and cook in the oven for about 20 minutes, or until the carrot is tender but still firm.

Add the cooked vegetables to the warm lentils, followed by the chopped herbs and stir gently. Taste and adjust the seasoning. Spoon the lentils onto serving plates. Pile some eggplant in the center of each portion and top it with a dollop each of crème fraîche or yogurt and harissa. Finish with a trickle of oil.

Korean Green Onion and Seafood Pancakes (Pa Jun) by Cynthia Raub

Print Friendly and PDF

Korean people love their pancakes! Kimchi pancakes, green onion pancakes, sliced fish pancake fritters, mung bean pancakes, chive pancakes with a million jalapeños . . . the list is seemingly endless. If it's a thing, it can be pancaked. I love them all, but I especially like this one because it doesn't require any ingredients you couldn't find in a standard grocery store. I can confidently speak for myself, for you, and every other living being in the world when I say: when you are craving Korean food, it must be satisfied immediately. Mung beans, Asian chives and kimchi can often require a special trip to an Asian market. Ain't nobody got time for that! These green onion pancakes are tender, crisp and beautifully golden. The mild sweetness of the cooked and aromatic green onion is absolutely addictive. If you've never made Korean food before, this is an accessible and tremendously delicious place to start.

Notes: The green onion pancake my mom made at her restaurant was 80% green onion and that's the recipe I'm sharing with you. Some people prefer less green onion and more batter and this recipe is flexible enough for you to suit your own preferences. This is a very hands on cooking process as you can tell by the photos. I use my hands to lay the battered green onions into the pan, to distribute the raw egg, and to press the pancake to create a crunchy crust. Don't be afraid to use your hands - it will be so much easier than a multitude of utensils. To reheat the pancakes, place them in a non-stick pan on medium heat and heat through on both sides to enjoy them again. Please don't put them in the microwave; that will make everyone sad.

The dipping sauce is such a great accompaniment to the pancakes - it's worth the added few steps. The onions and jalapeño impart their flavors into the liquid and the hot liquid quickly pickles the onion and jalapeño to tone down their harshness and heat.


Yield: 3 large pancakes
Time: 40 minutes

2 large bunches green onions
4 eggs, divided
1 1/2 cups water
1 cup flour
1/4 cup cornstarch
2 tablespoons salt
6 tablespoons grape seed oil (or any other neutral oil), divided
1/2 cup chopped raw shrimp, divided
1/2 cup chopped raw squid, divided

Pancake Dipping Sauce for serving (see recipe below)

Rinse green onions and remove tops. Trim bottoms to make all of the green onions similar in length. Lay them on the cutting board and slice through the entire length of the vegetable - this will make biting through the cooked green onion easier and less stringy. Halve the green onions and set aside.

In a medium bowl, combine water and one egg and whisk until foamy. In a shallow pan (I used an 8 x 13 cake pan) combine flour, cornstarch and salt. Start by pouring 1 cup of foamy water/egg mixture into dry ingredients and stir gently until roughly combined - like a standard pancake mixture, wet and dry patches are OK since you don't want to over-mix the batter! From there, add more liquid a few tablespoons at a time until the batter is thick enough to hold together and coat the green onions, but is not gloopy and sticky, nor runny.

Heat a large pan or griddle on medium high heat with 2 tablespoons of grape seed oil. Add 1/3 of the green onions to the batter and toss until fully coated. Turn the heat down and arrange batter covered green onions in the pan in a single row with no space between the green onions. Turn the heat back up to medium-high and press the green onions into the pan to create a cohesive crust. Once the batter begins to brown and the green onions are heating through, scatter 1/3 of the seafood over the top of the pancake. Beware of oil popping at this point!

Press the seafood down into the pancake. Crack an egg into a small bowl and whisk lightly. Pour the egg over the top of the pancake, making sure to cover the seafood (the egg will help to secure the seafood to the pancake). When the seafood begins to warm and 70% of the pancake is cooked through (4-6 minutes), flip the pancake over to finish cooking and brown the second side (about 2 minutes). The pancake is done when the batter throughout the green onions is throughly cooked the edges are deeply browned and crisp. Flip the pancake onto a cutting board with the seafood and egg mixture facing up. Cut into generous bite sized pieces. Repeat two more times for a total of 3 pancakes. Serve immediately with the Pancake Dipping Sauce.

Pancake Dipping Sauce

1 cup soy sauce
1/2 cup water
1/4 cup sugar
1/4 white vinegar
1 jalapeño, halved
1 small onion, sliced thin

In a small sauce pan over medium heat, combine soy sauce, water, sugar and vinegar. Bring to a simmer until all of the sugar is dissolved. In a medium heat-proof bowl, place sliced onion and halved jalapeño. Pour the simmered soy sauce mixture over the onions and jalapeño and allow to fully cool before serving.

Fresh Egg Pasta by Amy Cantu

Print Friendly and PDF

I never fully understood why anyone liked pasta with butter and parmesan. It always just sounded bland and boring to me. I filed it under "picky kid food". This luscious and ethereal fresh egg pasta changed my entire understanding of what pasta with butter and parmesan could actually mean. These wide ribbons were at once delightfully delicate and richly filling. A quick toss with a pat of butter and shower of grated parmesan infused the springy strands with a bit of luxury and saltiness without masking its simple glory. Cynthia and I went mad for it - dancing around the kitchen, swooning, moaning, eyes-rolling-into-the-back-of-our-heads, madness. This fresh pasta meets and exceeds any and all expectations you might have for homemade noodles.  If eating a bowl of nothing but plain pasta is too one note for you, (I promise that I struggled to consider eating anything else with it,) Cynthia's spring vegetables are a bright and punchy (if not guilt-appeasing) match to the simple indulgence of homemade pasta.

Notes: Homemade pasta is not terribly difficult to make, even for a novice. It can even be made with no special equipment, except perhaps a rolling pin. I had a pasta machine collecting dust in the closet (I almost forgot I even had it and only used it once 10 years ago), so I pulled it out to see if it still worked. It does, and it's been getting a lot of use ever since we tested this recipe. I pulled inspiration and direction from both Serious Eats, which has yet to fail me, and also a recipe from Melissa Clark in New York Times Cooking. I love the delicate richness of an extra egg yolk and detailed, fool-proof directions from Serious Eats; I also liked the addition of olive oil in Melissa Clark's version, which added flavor and made the dough easier to roll out. My first batch of pasta sported some ragged edges and uneven texture, but it still tasted better than any pasta I'd ever eaten. So, don't toss out any uglies - close your eyes and enjoy the perfect taste!

If the recipe makes more pasta than you need, the strands can be twisted together into a few loose nests and then frozen to cook later. The frozen pasta can be cooked without thawing, adding an extra minute or two to cook through.


Time: 1 hour
Serves: 4-6

2 1/4 cups all purpose flour
1 teaspoon kosher salt
1 tablespoon extra version olive oil
2 eggs
4 egg yolks

Dump the flour onto a clean work surface, making a large well in the center. Sprinkle the salt and drizzle the olive oil over the flour. Carefully pour the eggs and egg yolks into the well. Use a fork to break up the egg yolks and beat well. With a bench scraper, fold flour into the egg, creating a shaggy dough ball. Scrape the dough from fingers then continue to knead the dough using the heels of your hands until the dough is very smooth and elastic. Add additional water 1 tablespoon at a time, if the dough feels too dry, or add additional flour 1 tablespoon at a time, if the dough feels too wet. Wrap dough in plastic wrap and let rest at least 30 minutes on the countertop or overnight in the fridge.

To use a pasta machine:

Cut dough into quarters. Place one quarter on a lightly floured work surface and re-cover the remaining dough. Using a rolling pin, roll the dough into an oblong shape about 1/2-inch thick.

Set the pasta machine to the widest setting. Pass the dough through the pasta machine to make a sheet, then repeat 2 more times. 

Place dough on a lightly floured work surface. Fold both ends in so that they meet at the center of the dough, and then fold the dough in half where the end points meet, trying not to incorporate too much air into the folds. Using rolling pin, flatten dough to 1/2-inch thick. Pass through the rollers 3 additional times.

Reduce the setting, and repeat rolling and folding the dough, passing it through the machine 2 or 3 times before going to the next setting. For pappardelle and fettuccine, stop rolling when the dough is about 1 or 2 settings wider than the thinnest one on your roller. For lasagna noodles, and for ravioli and other stuffed or filled pasta, go to the thinnest setting. 

Narrow the setting by 1 notch and repeat the folding and rolling process. Repeat once more (the dough should now have passed through the third widest setting). Continue passing the dough through the rollers, reducing the thickness by 1 setting each time until it reaches the desired thickness. It should now be very delicate and elastic to the touch, and slightly translucent.

Place rolled dough onto a work surface or baking sheet lightly dusted with flour or lined with parchment paper, folding the dough over as necessary so that it fits; sprinkle with flour or line with parchment between folds to prevent sticking.

Cover dough with plastic wrap or a kitchen towel to prevent drying, then repeat rolling and folding process with remaining dough quarters. If making noodles, cut dough into 12- to 14-inch segments. Run the dough through the pasta machine again using the cutter attachment, or cut the dough into your desired width using a pizza cutter or chefs knife.

If rolling by hand:

Cut the rested dough into 2 pieces, keeping them covered with plastic wrap or a dish towel when not in use. Use a rolling pin to flatten the dough until it is as thin as a penny for fettuccine and pappardelle, or even thinner for lasagna sheets. This will take some time and arm strength, but the process is easy and the results are rewarding! Cut the noodles to the desired width and length using a pizza cutter or chefs knife.

To cook the pasta:

Bring a large pot of well-salted water to a boil, add fresh pasta and boil for 1 to 3 minutes, depending on thickness of the pasta. Drain well. 

To enjoy this simple indulgence, toss noodles with butter, a light sprinkling of coarse salt, and a heavy shower of freshly grated parmesan cheese. Perfection!

All-Purpose Cornbread by Cynthia Raub

Print Friendly and PDF
cornbread

Cornbread is what happens when my two favorite things: corn and bread, get a little crazy - one thing leads to another, and 25 minutes later . . . they make a baby. A crumbly, slightly sweet, and aromatic baby. A cornbread baby that begs for a pat of butter or a drizzle of honey on it’s warm browned top. The variations in cornbread can make one dizzy. People get crazed and lose their minds when it comes to the “right” or “best” way to make it. Street brawls, wars, divorces . . . sadly, all started by disagreements over cornbread. And if I’ve learned anything in life, it’s to avoid the following topics for the sake of polite conversation: religion, politics, and you guess it, cornbread. When Amy said she was making Chicken Chili, I grabbed the basic pantry items for this recipe, got pants on my kids, and drove to her house to cook and eat. This cornbread was the perfect unfussy accompaniment to her tomato-y chili.

Notes: This is a solid recipe for a basic and uncomplicated cornbread that will not let you down. Pureeing (fresh, frozen or canned) corn kernels into the wet ingredients will give you the distinct flavor you won’t get from cornmeal alone, and a sweetness that honey cannot replicate. According to Cook’s Illustrated, this recipe calls for the cornbread to be cooked at a high temperature in a regular baking pan to produce a crunchy, toasted crust. If you’re a cast-iron skillet for everything (especially cornbread) type, you can ratchet down the temperature for this recipe since the skillet will produce a golden crust with less heat.

Yes, this recipe calls for a stick of butter. But it’s not like you’re going to eat the whole pan by yourself, right? Right . . . ? OK, even if you do eat the whole pan by yourself, (Go you! Now THAT’S commitment!) just remember that chewing and breathing burns calories too. You're a winner and don't let anyone tell you otherwise.


SEE MORE: The Shared Chili


Servings: 8"x8" pan
Time: 45 minutes

Cook's Illustrated All-Purpose Cornbread

Ingredients:
1 1/2 cups unbleached all-purpose flour
1 cup yellow cornmeal
2 teaspoon baking powder
1/4 teaspoon baking soda
3/4 teaspoon table salt
1/4 cup packed light brown sugar
3/4 cup frozen corn kernels, thawed
1 cup buttermilk
2 large eggs
8 tablespoons (1 stick) unsalted butter, melted and cooled slightly

Directions:
Preheat oven to 400 degrees, adjust oven rack to the middle position. Butter an 8-inch square baking dish or cake round, set aside.

Whisk flour, cornmeal, baking powder, baking soda, and salt in a large bowl until combined.

In a food processor or blender, process brown sugar, thawed corn kernels, and buttermilk until combined, about 5 pulses. Add eggs to the wet mixture and process until combined (corn pieces will remain), about 5 more pulses.

Make a well in the center of the dry ingredients; pour wet ingredients into the well. Fold dry ingredients into wet, mixing until barely incorporated. Add melted butter and continue folding until the dry ingredients are moistened.

Pour batter into prepared baking dish, smooth surface with a rubber spatula.

Bake for 25-35 minutes until golden brown, and toothpick inserted in the center comes out clean. Slice and enjoy!

Adapted From: Cook's Illustrated

Swedish Meatballs by Cynthia Raub

Print Friendly and PDF
swedish meatballs

My two daughters had preschool potlucks on consecutive days - one in the morning and one in the afternoon. What could I cook that would work for both mealtimes? I wanted to bring something that: I could cook in bulk, was not very costly, could be prepared in advance, and was easy for preschoolers and standing parents to eat. Swedish meatballs were perfect! They are bite-sized and dense, making them an easy to serve and eat finger food. Not to mention, they are a preschooler’s favorite color of food: brown (see: crackers, toast, peanut butter, chocolate…). To make things interesting, I decided to quadruple the recipe to have generous portions for the two preschool parties, enough to freeze for my family and a bag for Amy.

Notes: In this recipe, I decided to shallow fry the meatballs to keep their beautiful round shape intact. This method is not for everyone, or for every occasion, but I was happy with the results. Alternatively, you can bake the meatballs at 350 degrees for 18-24 minutes; either directly on a baking sheet/baking pan or on a wire rack, so the fat can drip down. There are pros and cons to shallow frying and baking, but a big pro of baking is that you can scrape the little fatty bits from the pan into the gravy to make it extra delicious!

Also, this recipe calls for sweated onions, but I decided to cook half of the onion and keep half of the onion raw. I liked how the cooked onion lent a small amount of sweetness in a bite, but I loved how the raw onion cut through the beef flavor. The allspice and nutmeg in this recipe were so subtle that I think these meatballs are highly adaptable to numerous uses and cuisines. The spices are traditional for Swedish meatballs, but the gravy is what made it so. One night, my husband threw a dozen frozen meatballs into a vegetable soup for dinner and the allspice and nutmeg were almost undetectable. Amy used them in a completely different way, too, in her Meatballs with Tomato Sauce and Polenta.


Time: 1 hour
Servings: 30 2 oz meatballs, around 6 portions
Adapted from: Alton Brown, Swedish Meatball Recipe

For the Meatballs
3 cups of cubed white bread, crusts removed
1/2 cup whole milk
2 tablespoons butter
1 cup finely chopped onion
1 tablespoon kosher salt (plus more to taste)
1.5 pounds ground beef (I used 92% lean and 8% fat)
1.5 pounds ground pork
3 large egg yolks
1 teaspoon black pepper
1/2 teaspoon ground allspice
1/2 teaspoon freshly grated nutmeg
8 oz canola oil

For the Gravy
3 tablespoons of unsalted butter
4 tablespoons all-purpose flour
2 cups chicken broth
Splash of Worcestershire or soy sauce
1/2 teaspoon lemon juice or apple cider vinegar
1/2 teaspoon white pepper
Parsley, finely chopped- optional for garnish
1/4 cup sour cream, optional, to finish the gravy

Place bread in a small bowl, pour milk over and mix, set aside.

Heat 2 tablespoons of butter in a pan over medium heat. Add half of the onion (1/2 cup) and sweat until the onions are translucent and soft. Remove onions from the pan and set aside to cool.

In a stand mixer bowl, combine the bread and milk mixture, ground beef, pork, egg yolks, 1 tablespoon of kosher salt, black pepper, allspice, nutmeg, raw onions, and cooked onions. Mix until very well combined and the meat has become sticky and homogenous. Using a 2-ounce cookie scoop, portion, and then roll each meatball with your hands and place on a sheet pan.

In a 12" straight edge saute pan, heat oil to 250 degrees. Add the meatballs in small batches and fry until golden brown on all sides, about 7 to 10 minutes. Remove the meatballs to cooling rack with a slotted spoon or tongs.

In a medium saucepan, melt remaining 3 tablespoons butter over medium-high heat until foamy. Whisk in flour and cook until raw flour smell is gone and the mixture is lightly browned, about 3 minutes. Slowly whisk in chicken stock and bring it to a boil. Once at a boil, lower the heat to a simmer and cook until thickened, about 3 minutes. Whisk in a splash of soy sauce (or Worcestershire) and acid. Season with salt and white pepper. If you are feeling sassy, stir in 1/4 cup of sour cream to give the gravy a beautiful creamy look and tangy flavor.

Add meatballs to gravy and stir to coat. Simmer until meatballs are heated through. Garnish with chopped parsley!