dessert

Cynthia Raub

Lemon Poppy Seed Cookies by Cynthia Raub

Print Friendly and PDF

I love lemon poppy seed anything: cookies, muffins, scones, you name it! These cookies are addictively crisp, with a tender crumb and are a perfect addition to any cookie assortment. The lemon zest lends a fragrant floral note in addition to its citrusy sweetness. These cookies are especially delicious with tea because of they are delicate and subtly sweet. This recipe is simple, adaptable, and perfect for preparing in advance for your special occasions. 

Notes: I have adapted this recipe from Smitten Kitchen, who has adapted a simple slice and bake recipe from cookie queen Dorie Greenspan. Deb of Smitten Kitchen recommends different add-ins such as cranberries and orange, or lime and cornmeal - the possibilities of substitutions are endless with this recipe. To get a beautifully round cookie, roll the log tightly in the plastic wrap as described in the instructions. If you have an empty paper towel roll handy, cut through it lengthwise and nestle the dough roll inside of it to protect the roll's round edges.


Read More: The Shared Cookies


Time: 30 minutes active,  2.5 hours inactive
Yield: About 30 cookies

2 sticks (1 cup) unsalted butter, at room temperature
2/3 cup confectioners’ sugar, sifted
2 large egg yolks, at room temperature
Pinch of salt
1 teaspoon vanilla extract
1 teaspoon lemon extract
2 cups all-purpose flour
Zest of 2 lemons (about 2 heaping tablespoons)
1/3 cup poppy seeds

Beat room temperature butter on medium speed in a stand mixer with the paddle attachment until smooth. Add sifted confectioners sugar and continue to beat on medium until smooth. Once smooth, add egg yolks, one at a time until incorporated. Add salt, vanilla extract, lemon extract, lemon zest and poppy seeds- beat until combined and smooth. Lower the mixing speed and add the flour, a 1/2 cup at a time. Continue to mix until wet mixture binds to the flour but do not over mix. 

Turn the dough out onto a clean work surface and gently gather it into a ball. Divide the ball into two and wrap each half in plastic wrap- refrigerate for 30 minutes.

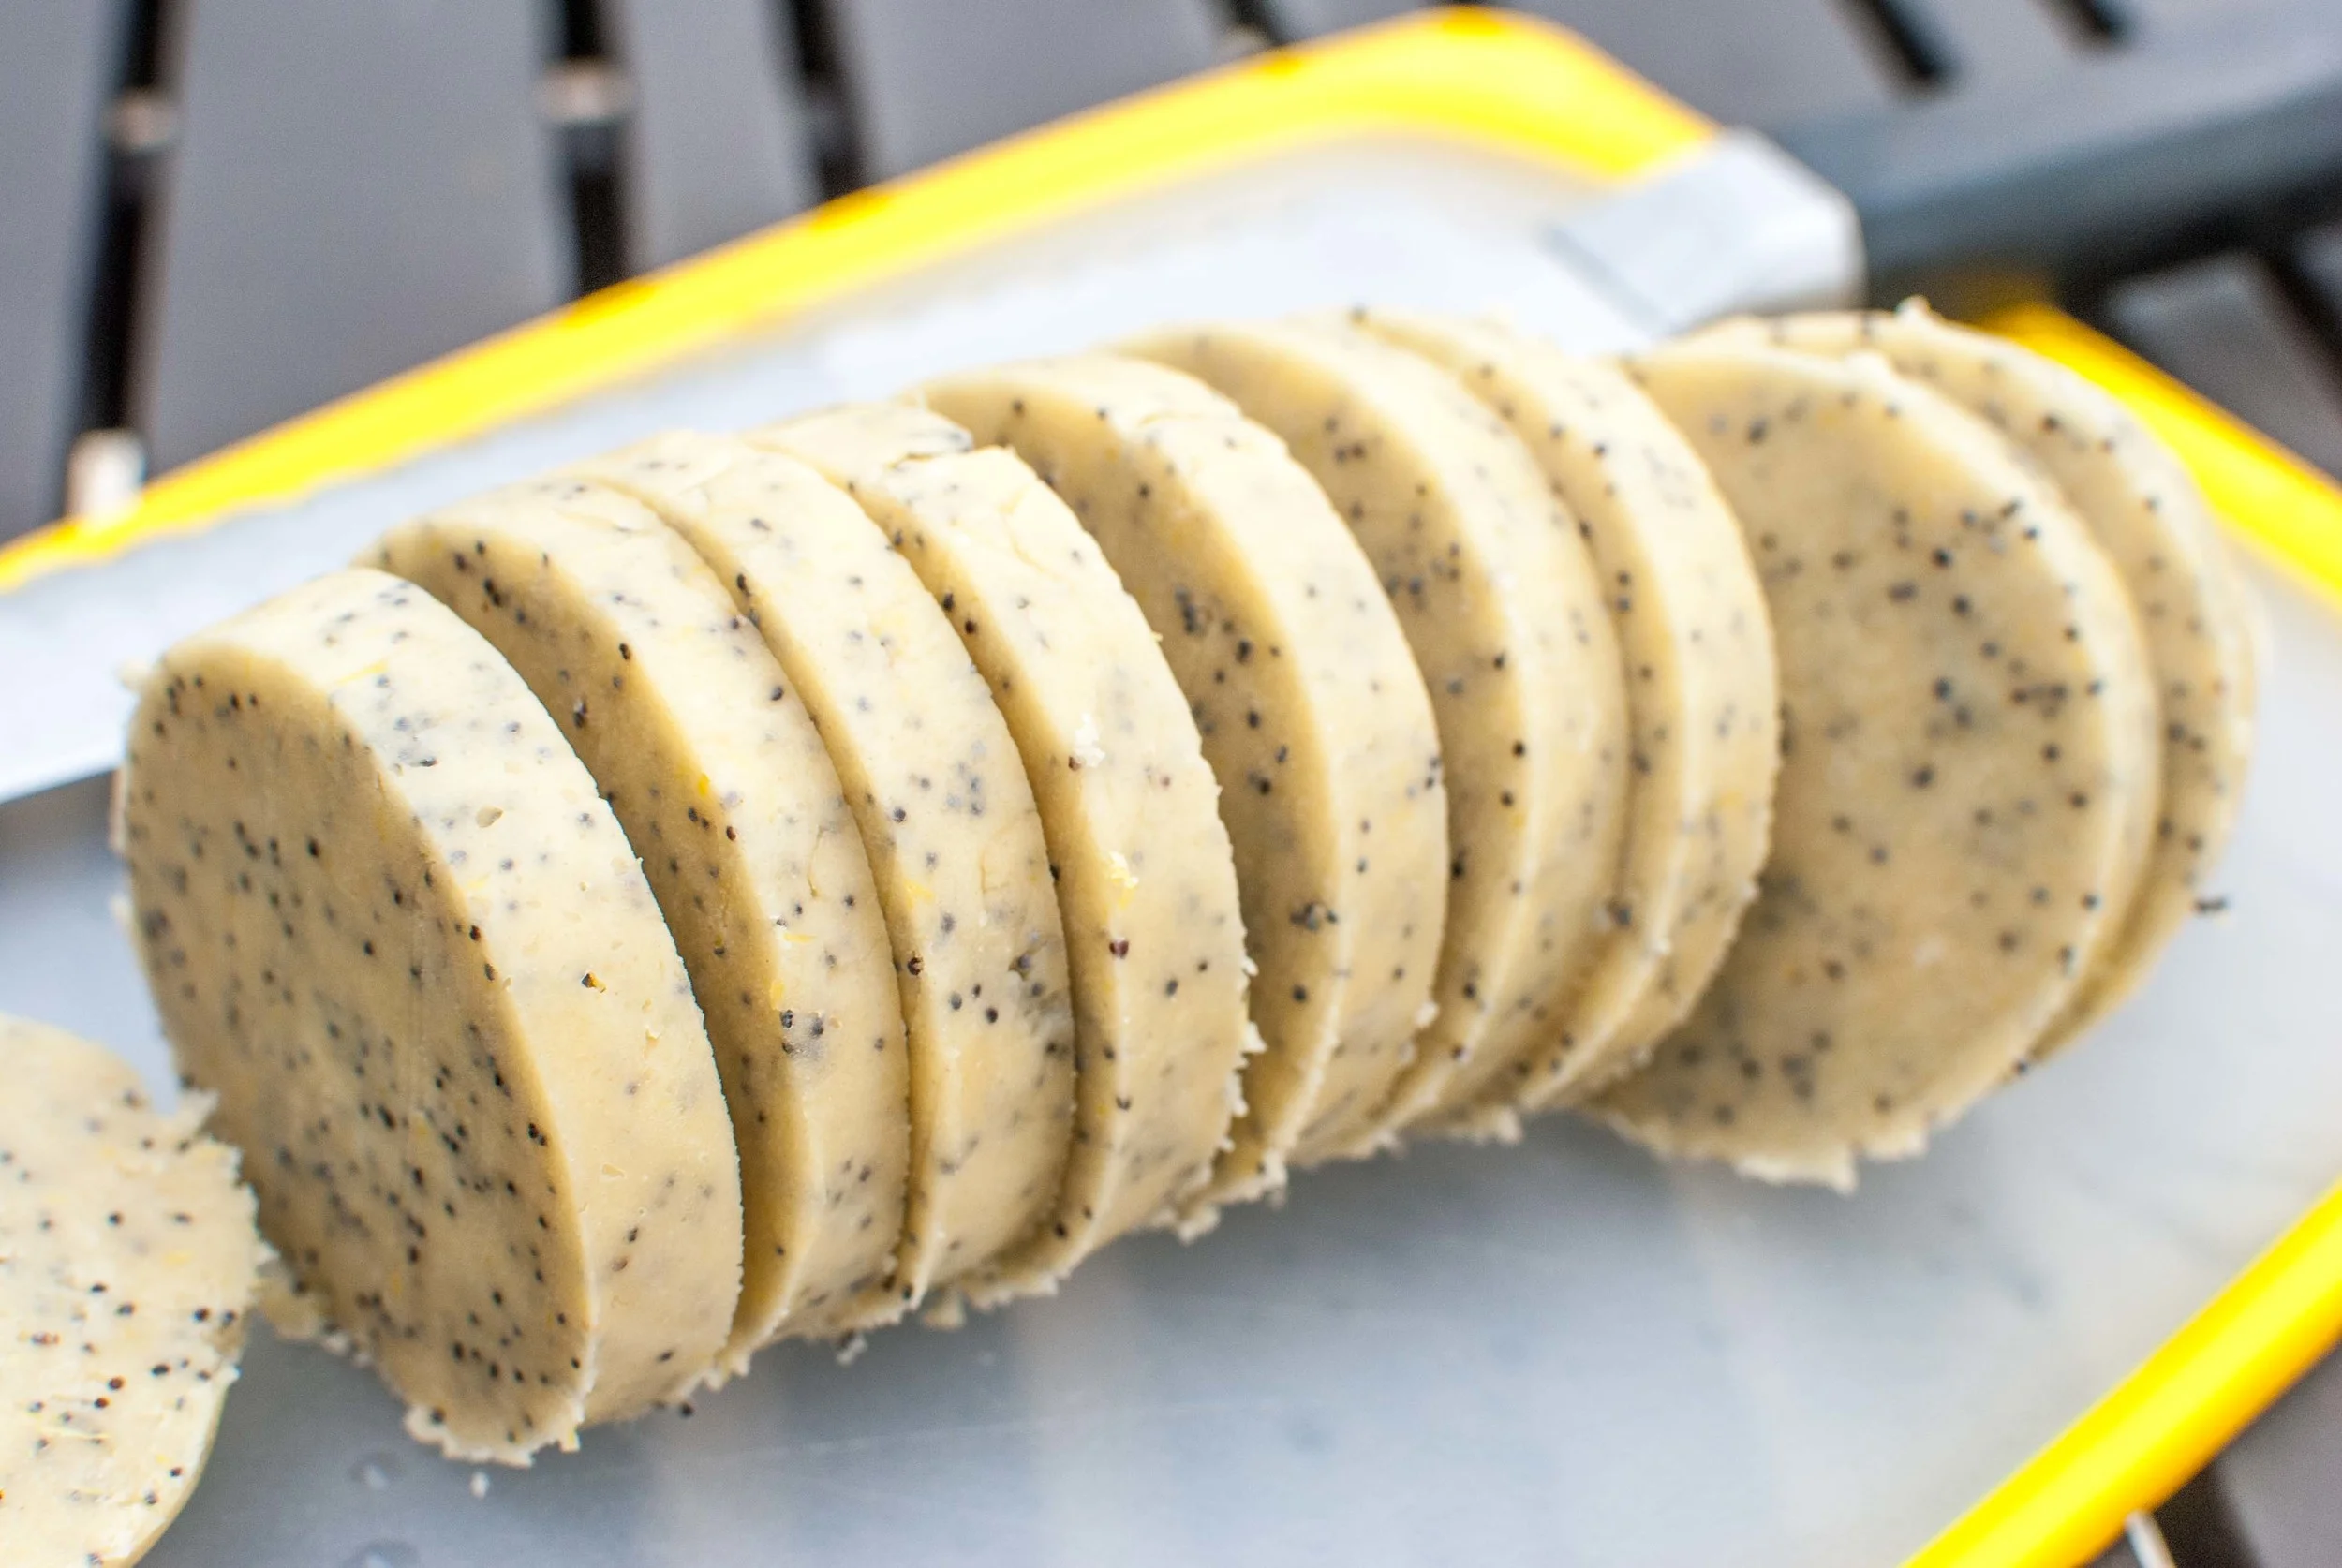
After 30 minutes of resting and firming in the refrigerator, remove one dough ball from its plastic wrap and roll gently into a log (about 1.5 inches thick) on a clean and flat surface. Place the rough log onto a clean sheet of plastic wrap, wrapping the plastic wrap around the length of the log to secure the shape. Take the ends of the plastic wrap and roll the log of dough against the table away from your body until the plastic wrap is taught and the ends are secure. Repeat with the second roll, and refrigerate for at least 2 hours. *Optional: Cut a toilet paper roll or paper towel roll through its length and place the log(s) into the roll- this will protect the log from developing a flat side.

Preheat oven to 350°F and line baking pans with parchment paper. Remove the dough logs from the refrigerator, unwrap it from its plastic and place on a cutting board. With a sharp knife, slice log into 1/4" thick cookies. Gently pat the rough cut edges of the cookies with your fingers, rounding out any flat or uneven spots and place on baking pan with 1 inch space between cookies.

Bake the cookies for 12-15 minutes until crisp and barely golden. Rotate the baking sheet halfway through baking to ensure even cooking. Transfer to a wire rack to cool to room temperature.

Strawberry Rhubarb Crisp Bars by Cynthia Raub

Print Friendly and PDF

These Strawberry Rhubarb Crisp bars are the whole package: delicious, uncomplicated and healthy! (Or at least healthy enough to pass for breakfast, which we were all too happy to eat!) The crisp oat layer on the bottom comes together in the baking dish without dirtying another bowl. The bright rhubarb and sweet strawberry are diced finely and scattered over the crust, which is then finished with some reserved oats as a golden crumble topping. The result is a thick, chewy bar oozing with lightly sweet and tangy fruit, that promises to be an all-occasion go-to recipe.

Notes: These Strawberry Rhubarb Crisp Bars can be dressed up with a scoop of vanilla ice cream or a dollop of whipped cream to create a dessert no one in their right mind would ever turn down. They can be drizzled with a bit of yogurt and masquerade as breakfast (so good!) or brunch. As-is, these bars are delicious and sturdy enough to cart to a summer BBQ, picnic, or bake sale. It's the go-anywhere, anytime, for anyone bar! I have made several iterations of this recipe, swapping out the fruit, and it’s always a tasty treat. 


Yield: 9 large bars
Time: 55 minutes

1 cup rolled oats
3/4 cup plus up to 2 tablespoons extra all-purpose flour
1/2 cup light brown sugar
Heaping 1/4 teaspoon kosher salt
6 tablespoons unsalted butter, melted
1 teaspoon cornstarch (optional, but helps firm up the filling)
1 tablespoon lemon juice
1 tablespoon granulated sugar, divided
1 cup small-diced rhubarb (from about 1 1/2 medium stalks)
1 cup small-diced strawberries

Heat oven to 375 degrees F. (For easy removal, line bottom and two sides of 8-by-8-inch square baking pan with parchment paper.)

Place oats, 3/4 cup flour, brown sugar and salt in bottom of baking pan and mix. Pour melted butter over, and stir until clumps form. If the clumps feel soft or look overly damp, add the remaining 2 tablespoons flour. Set aside 1/2 cup of the crumble mixture. Press the rest of the crumb mixture evenly in the bottom of the pan.

Spread half the fruit over the crust. Sprinkle it evenly with cornstarch, then lemon juice, and 1/2 tablespoon of granulated sugar. Spread remaining fruit over this, and top with second 1/2 tablespoon sugar. Scatter reserved crumbs over fruit and bake bars for 30 to 40 minutes (firmer fruits will take longer), until fruit is bubbly and crisp portion is golden.

Let cool in pan. For a crisper crust, serve cold straight from the fridge.

Recipe adapted from Smitten Kitchen

Apple Pie by Cynthia Raub

Print Friendly and PDF
AboutPhoto-9.jpg

I craved caramel with the tart Granny Smith apples -- so I chose a classic apple pie recipe from The Joy of Baking, that included two additional and simple steps to develop a caramel sauce. Macerating the apples in sugar and salt in the first few steps produced a juice, that when combined with butter over low heat, turned into a light caramel syrup. The sauce added richness and depth to the apples, it also helped bind the filling to make for a neat slice.

Recipe from: http://www.joyofbaking.com/ApplePie.html

Notes: I was ambitious with the first pie, creating a lattice top and braided edge -- unfortunately, I had too large of a gap between my lattice pieces which lead to the top layers of apples and caramel sauce drying out. My second attempt, with a fully covered top with vents, turned out markedly better. It was moist, so the tender apples clung to the buttery pie crust and it sliced perfectly.


READ MORE: THE SHARED PIE


2 1/2 pounds apples (about 6 large), peeled, cored, and sliced 1/4 inch thick (I used half HoneyCrisp and half Granny Smith)
1/4 cup granulated white sugar
1/4 cup light brown sugar
1 tablespoon lemon juice
1 teaspoon ground cinnamon
1/4 teaspoon ground nutmeg (optional)
1/4 teaspoon salt
2 tablespoons unsalted butter
1 1/2 tablespoons cornstarch or flour
Pastry for double-crust pie, 9-inches (This is my go-to recipe: http://www.joyofbaking.com/PieCrust.html)

In a large bowl combine the sliced apples with the sugars, lemon juice, ground cinnamon, nutmeg, and salt. Let sit at room temperature for at least 30 minutes or up to three hours. Then, place the apples and their juices in a strainer that is placed over a large bowl (to capture the juices). Let the apples drain for about 15-30 minutes or until you have about 1/2 cup of juice. Put reserved juice into small pot with butter, reduce for 6-9 minutes at a medium temperature until syrupy and caramelized.

Meanwhile, remove the top pastry crust from the refrigerator and let it sit at room temperature for about 10 minutes so it has time to soften. Transfer the drained apples slices to a large bowl and mix them with the cornstarch. Then pour the reduced syrup over the apples and toss to combine. Pour the apples and their syrup into the chilled pie crust. Moisten the edges of the pie shell with a little water and then place the top crust over the apples. Tuck any excess pastry under the bottom crust and then crimp the edges using your fingers or a fork. Using a sharp knife, make five- 2-inch slits from the center of the pie out towards the edge of the pie to allow the steam to escape. Cover the pie with plastic wrap and place in the refrigerator to chill the pastry while you preheat the oven.

Preheat the oven to 425 degrees F. Place the oven rack at the lowest level and place a baking stone or baking sheet on the rack before preheating the oven. Place a piece of aluminum foil on the stone (or pan) to catch any apple juices. Set the pie on the stone or pan and bake for about 45 to 55 minutes or until the juices start to bubble through the slits and the apples feel tender (not mushy) when a toothpick or sharp knife is inserted through one of the slits. Make sure to cover the edges of the pie with a foil ring to prevent over browning after about 30 minutes. Remove the pie from the oven and place on a wire rack to cool for about 3-4 hours before cutting. Serve warm or at room temperature with vanilla ice cream or softly whipped cream. Store at room temperature for 2 to 3 days.

Makes one 9 inch pie. Recipe doubled to yield two pies.